오늘의 공부 내용은 전화번호 양식에 맞게 파싱을 해보겠다.
보통 회원가입 화면을 만들 때 전화번호를 받는다.
이때 전화번호 양식을 맞춰야하는데
보통 01012345678 처럼 하이픈(-)을 제외한 전화번호를 입력받는다.
하지만 여기서 중간마다 하이픈을 넣어주고 싶으면 여러 방법이 있는데.
이번 포스팅에서는 안드로이드에서 기본적으로 제공해주는 PhoneNumberUtils을 이용해 볼 것이다.
# 오늘의 예제 화면 미리 보기

본 예제는 ViewBinding을 사용한다 아직 숙지가 안되어 있다면 링크를 클릭해 학습을 하고 오는 걸 추천한다.
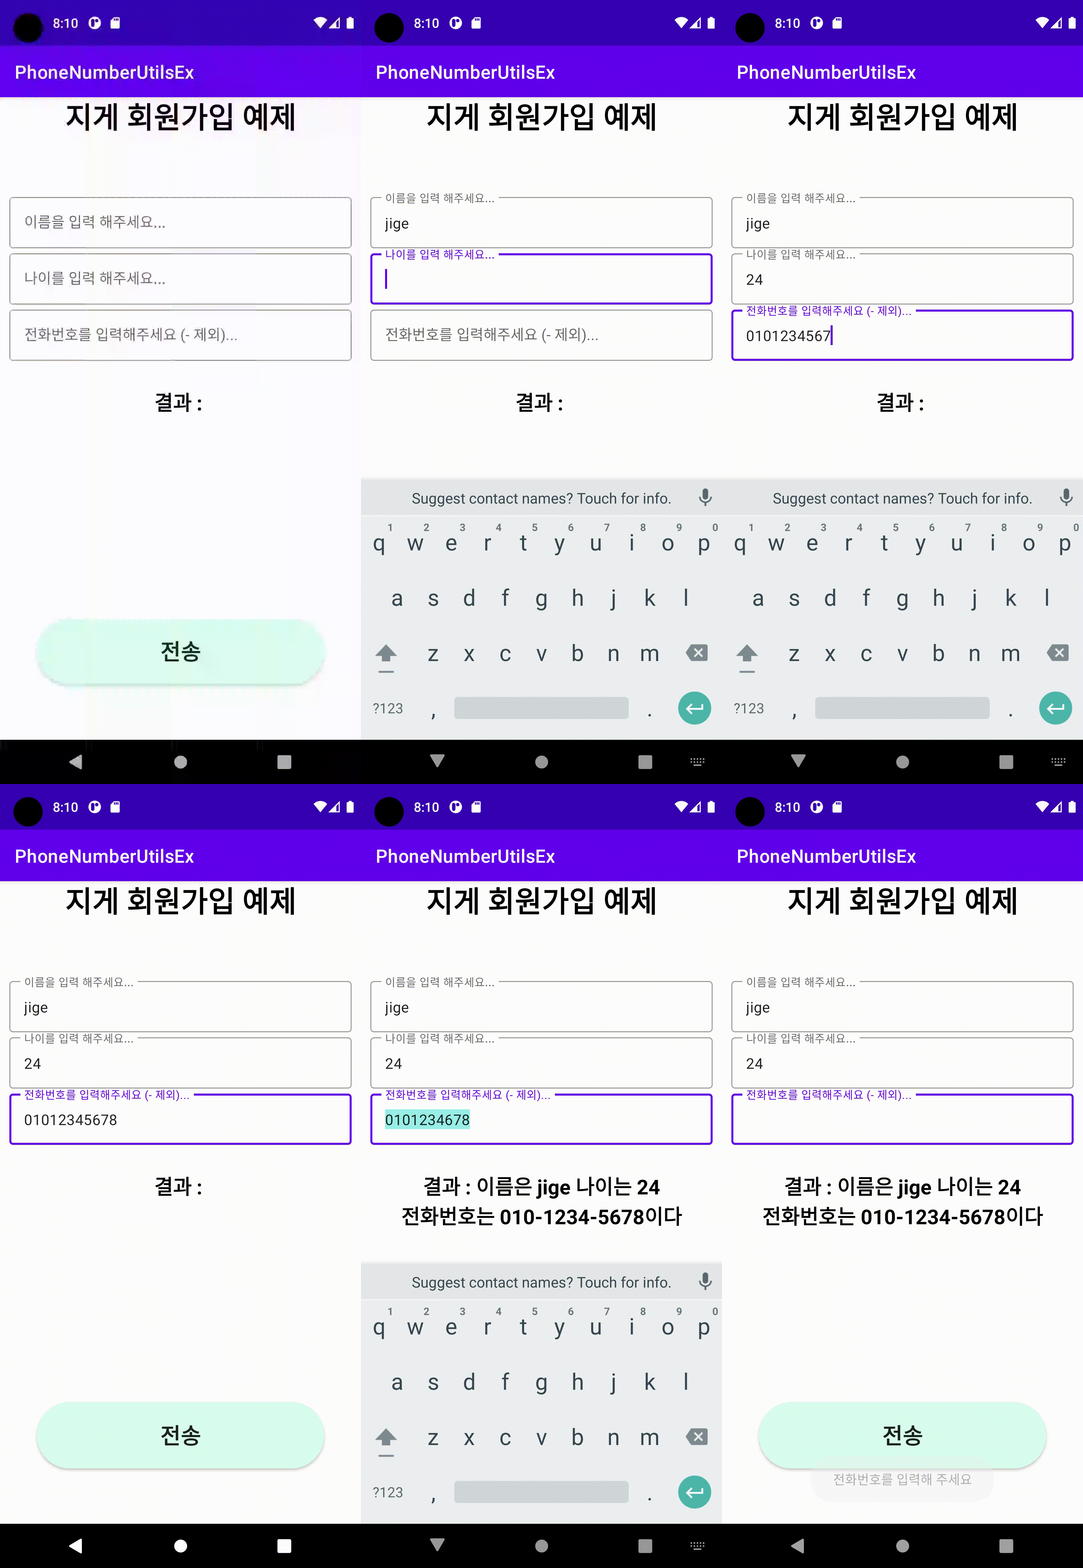
이름, 나이, 전화번호를 입력받고 그 결과를 출력하는 간단한 예제이다.
여기서 중요 포인트는 전화번호를 하이픈(-) 제외 후 입력받고 결과는 전화번호 사이에 하이픈을 추가해 출력을 해준다.
이제 코드를 보러 가자
# activity_main.xml
<?xml version="1.0" encoding="utf-8"?>
<androidx.constraintlayout.widget.ConstraintLayout xmlns:android="http://schemas.android.com/apk/res/android"
    xmlns:app="http://schemas.android.com/apk/res-auto"
    xmlns:tools="http://schemas.android.com/tools"
    android:layout_width="match_parent"
    android:layout_height="match_parent"
    tools:context=".MainActivity">

    <androidx.appcompat.widget.AppCompatTextView
        android:id="@+id/appCompatTextView"
        android:layout_width="match_parent"
        android:layout_height="wrap_content"
        android:text="지게 회원가입 예제"
        android:textAlignment="center"
        android:textColor="@color/black"
        android:textSize="32sp"
        android:textStyle="bold"
        app:layout_constraintTop_toTopOf="parent" />

    <androidx.appcompat.widget.LinearLayoutCompat
        android:id="@+id/linearLayoutCompat"
        android:layout_width="match_parent"
        android:layout_height="wrap_content"
        android:layout_marginTop="50dp"
        android:orientation="vertical"
        android:padding="10dp"
        app:layout_constraintTop_toBottomOf="@+id/appCompatTextView">

        <com.google.android.material.textfield.TextInputLayout
            style="@style/Widget.MaterialComponents.TextInputLayout.OutlinedBox"
            android:layout_width="match_parent"
            android:layout_height="wrap_content">

            <com.google.android.material.textfield.TextInputEditText
                android:id="@+id/inputUserName"
                android:layout_width="match_parent"
                android:layout_height="wrap_content"
                android:hint="이름을 입력 해주세요..."
                android:textColorHint="#8D8D8D" />
        </com.google.android.material.textfield.TextInputLayout>

        <com.google.android.material.textfield.TextInputLayout
            style="@style/Widget.MaterialComponents.TextInputLayout.OutlinedBox"
            android:layout_width="match_parent"
            android:layout_height="wrap_content">

            <com.google.android.material.textfield.TextInputEditText
                android:id="@+id/inputUserAge"
                android:layout_width="match_parent"
                android:layout_height="wrap_content"
                android:hint="나이를 입력 해주세요..."
                android:textColorHint="#8D8D8D" />
        </com.google.android.material.textfield.TextInputLayout>

        <com.google.android.material.textfield.TextInputLayout
            style="@style/Widget.MaterialComponents.TextInputLayout.OutlinedBox"
            android:layout_width="match_parent"
            android:layout_height="wrap_content">

            <com.google.android.material.textfield.TextInputEditText
                android:id="@+id/inputUserPhone"
                android:layout_width="match_parent"
                android:layout_height="wrap_content"
                android:maxLength="11"
                android:hint="전화번호를 입력해주세요 (- 제외)..."
                android:textColorHint="#8D8D8D" />
        </com.google.android.material.textfield.TextInputLayout>

    </androidx.appcompat.widget.LinearLayoutCompat>

    <androidx.appcompat.widget.AppCompatTextView
        android:id="@+id/textUserInfo"
        android:layout_width="match_parent"
        android:layout_height="wrap_content"
        android:layout_marginTop="20dp"
        android:text="결과 : "
        android:textAlignment="center"
        android:textColor="@color/black"
        android:textSize="22sp"
        android:textStyle="bold"
        app:layout_constraintTop_toBottomOf="@+id/linearLayoutCompat" />

    <androidx.cardview.widget.CardView
        android:layout_width="match_parent"
        android:layout_height="wrap_content"
        android:layout_marginHorizontal="40dp"
        android:layout_marginVertical="60dp"
        app:cardCornerRadius="40dp"
        android:elevation="30dp"
        app:layout_constraintBottom_toBottomOf="parent"
        app:layout_constraintEnd_toEndOf="parent"
        app:layout_constraintStart_toStartOf="parent">


    <androidx.appcompat.widget.AppCompatButton
        android:id="@+id/btnSand"
        android:layout_width="match_parent"
        android:layout_height="wrap_content"
        android:background="#DAFFEE"
        android:padding="20dp"
        android:text="전송"
        android:textSize="24sp"
        android:textStyle="bold" />
    </androidx.cardview.widget.CardView>

</androidx.constraintlayout.widget.ConstraintLayout>
기본적인 구조는 editText 3개와 결과를 출력하는 textView 1개 결과를 전송하는 button 1개가 있다.
여기서는 구조만 파악하고 다음 메인 클래스 코드로 넘어가자
# MainActivity.kt
package com.example.phonenumberutilsex

import androidx.appcompat.app.AppCompatActivity
import android.os.Bundle
import android.telephony.PhoneNumberUtils
import android.widget.EditText
import android.widget.Toast
import com.example.phonenumberutilsex.databinding.ActivityMainBinding

class MainActivity : AppCompatActivity() {
    private lateinit var binding: ActivityMainBinding
    override fun onCreate(savedInstanceState: Bundle?) {
        super.onCreate(savedInstanceState)
        binding = ActivityMainBinding.inflate(layoutInflater)
        setContentView(binding.root)

        events()
    }

    private fun events() {
        with(binding){
            btnSand.setOnClickListener {
                if (inputUserPhone.setText().isBlank()){
                    Toast.makeText(this@MainActivity, "전화번호를 입력해 주세요", Toast.LENGTH_SHORT).show()
                } else {
                    textUserInfo.text = "결과 : 이름은 ${inputUserName.setText()} 나이는 ${inputUserAge.setText()}\n전화번호는 ${setPhoneNumber(inputUserPhone.setText())}이다"
                }
            }
        }
    }

    // EditText의 text값을 String으로 바꿔주는 확장 함수
    private fun EditText.setText() = this.text.toString()

    // 전화번호 양식을 번경 시켜주는 함수
    private fun setPhoneNumber(phoneNumber: String):String{
        // removeRange를 이용하여 맨앞 0을 지워주고 대한민국 국가 코드인 +82를 추가 해준다.
        return PhoneNumberUtils.formatNumber("+82${phoneNumber.removeRange(0, 1)}", "KR")
    }
}
우선 전체 코드는 이렇다.
이제 하나하나 살펴보자
## fun events()
private fun events() {
    with(binding){
        btnSand.setOnClickListener {
            if (inputUserPhone.setText().isBlank()){
                Toast.makeText(this@MainActivity, "전화번호를 입력해 주세요", Toast.LENGTH_SHORT).show()
            } else {
                textUserInfo.text = "결과 : 이름은 ${inputUserName.setText()} 나이는 ${inputUserAge.setText()}\n전화번호는 ${setPhoneNumber(inputUserPhone.setText())}이다"
            }
        }
    }
}
events의 함수는 단순 전송 버튼이 클릭 됐을 때 핸드폰 번호가 비어 있다면 토스트메시지 출력하고 그렇지 않으면 editText에 있는 text값들을 출력해주는 로직이다.
## fun setPhoneNumber() 예제에서 전화번호 포맷 맞춰주는 함수
// 전화번호 양식을 번경 시켜주는 함수
private fun setPhoneNumber(phoneNumber: String):String{
    // removeRange를 이용하여 맨앞 0을 지워주고 대한민국 국가 코드인 +82를 추가 해준다.
    return PhoneNumberUtils.formatNumber("+82${phoneNumber.removeRange(0, 1)}", "KR")
}
이 코드에서는 PhoneNumberUtils.formatNumber()가 안드로이드에서 기본적으로 제공하는 함수라고 알고 있으면 된다.
구성은 PhoneNumberUtils.formatNumber(휴대전화 번호, 국가단축이름)이다.
※ 주의할 점은 휴대전화 번호 파라미터에 010으로 시작하면 안 된다. 즉 앞에 +국가코드를 붙이고 010의 첫 글자인 0을 빼야 정상 작동한다.
깃허브
https://github.com/JiSeokYeom/PhoneNumberUtilsEx
GitHub - JiSeokYeom/PhoneNumberUtilsEx
Contribute to JiSeokYeom/PhoneNumberUtilsEx development by creating an account on GitHub.
github.com
참조
https://developer.android.com/reference/android/telephony/PhoneNumberUtils
https://www.masterqna.com/android/97834/phonenumberutils-formatnumber-%ED%95%98%EC%9D%B4%ED%94%88%EC%9D%B4-010-123-45678-%EC%9D%B4%EB%A0%87%EA%B2%8C-%EB%B6%99%EC%96%B4%EC%9A%94
'안드로이드 공부 노트' 카테고리의 다른 글
| [Android-Hilt] 안드로이드 Hilt(힐트)란? (0) | 2023.04.19 |
|---|---|
| [Android] DI(Dependncy Injection) 알아보기! (0) | 2023.02.05 |
| [Android] 안드로이드 Parcelable(@Parcelize) 사용해 액티비티간 데이터(Object) 전달하기 - Kotlin (2) | 2022.10.28 |
| [Android - Glide] 안드로이드 이미지 로드 라이브러리 Glide 사용법 - Kotlin (0) | 2022.10.09 |
| [Android] 안드로이드 registerForActivityResult()란?(startActivityForResult derpecated 해결 방법) (0) | 2022.05.29 |


